Pantera
Club
| Colorado Pantera Club |
|||
Rebuilding a Ford 351 Cleveland
Part 9: Testing and Tuning
| Ready for first-fire. OK, now that everything is installed in the car, it's time to start it up. For break-in I'm using Valvoline conventional 10W-40 oil. On the first start, keep the engine running at 2,000-2,500 rpm constantly for a solid 30 minutes. This rpm keeps the oil pressure high and helps the camshaft break-in. Don't rev it beyond that. If possible try to let it run consistently for 30 minutes (don't let it stall out). Don't take the car for a spin just yet! There will be time for that later. | 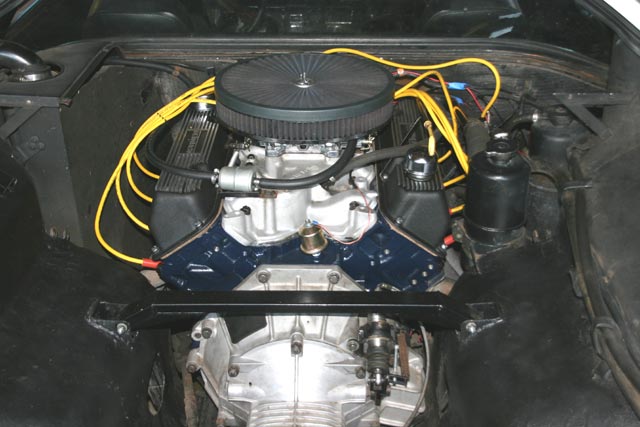 |
||
| Change oil and filter after 30 minute run-in. After the engine has had a chance to run for a solid 30 minutes, shut her down and drain the oil. Don't be surprised to see all kinds of nasty stuff in the oil. Don't worry too much about that, but do check for coolant in the oil. The K&P Engineering reusable oil filter seen here is nice for this application. Check out the nasty stuff we collected during the 30 minute run-in! Now is a good time to double check for coolant or fuel leaks as well around the engine. | 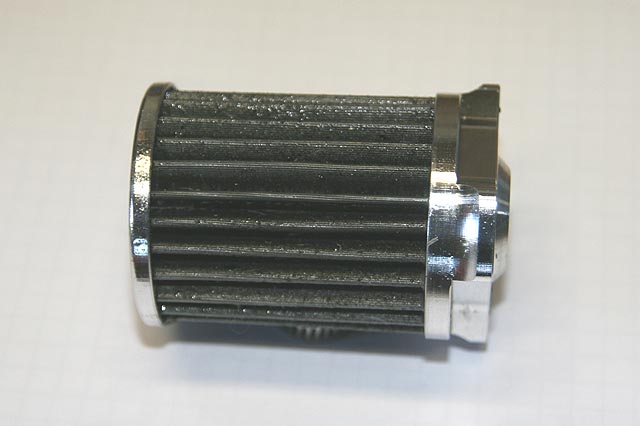 |
||
| Clean (or replace) the oil filter. Again, I have the luxury of a reusable oil filter with a stainless steel element, so we rinsed the filter element in solvent and sprayed it out with compressed air. The gunk that came out of the filter was scary! Seen here are silicone chunks and metal shavings. This is why the 30 minute run-in is so important. You don't want this crud running through your oil system very long. After cleaning the filter, I reassmbled it and put it back on the engine. Then I poured in 9.5 quarts of fresh 10W-40 conventional oil. | 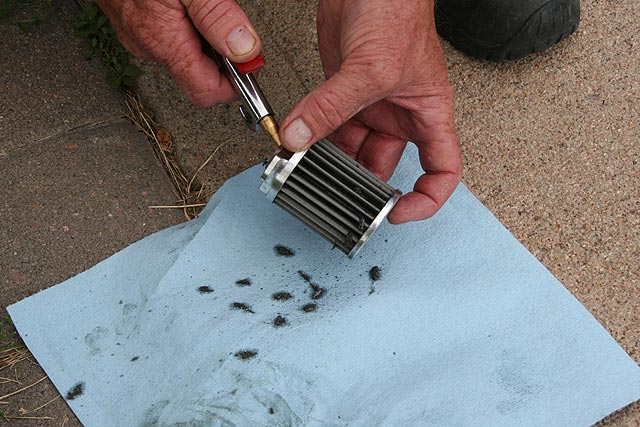 |
||
| Now it's time for some road testing! If everything looks good after the 30 minute run-in, it's time to take the car out on the road. Ford recommends keeping the engine speed below 4000 rpm until you have 500 miles on the engine. So don't spin it too high on the first run! For break-in you want to vary the rpms as much as possible. City driving is good for this - but that's no fun in the Pantera. I hit the local canyons frequently instead. After each run I take a quick look at the engine to make sure everything looks OK. |  |
||
| Carburator Tuning Here's a brief overview of basic set-up for an Edelbrock 4bbl carburator. I'm not going to get into how to adjust the idle speed and idle mixture, as those are very well explained in the carburator manual (as well as many other web sites). These are a few pictures to aid in changing jets and rods. My carb is an Edelbrock Performer #1411 (4bbl, 750 cfm, w/electric choke). All the Edelbrock Performer 1400-series models look pretty similar. I initially ran the carburator "as-is" out of the box with factory jets and rods for the first 200 miles just to check that everything was working right on the engine. Then I changed the rods and jets per Edelbrock's recommendations to get a decent baseline carburator set-up for 6,000 feet altitude. That yielded much better throttle response and better fuel economy. After about 500 miles with that set-up I noticed the plugs were getting a little bit fouled, so I switched to a hotter plug (Autolite 26). I've run over 1,000 miles now on this set-up. The plugs look good and the car feels good so I think this is a good baseline set-up. Folks reading this will likely have to experiment with different rod, jet, and plug combinations based on the particulars of your engine and your driving environment. Always error on the rich side at first. And remember that I am tuning my car for 6,000 feet altitude, so if you're at sea level then this is probably too lean for you. UPDATE 2015: I changed the above jetting to be 3 stages lean on the primaries and running Autolite 25 (standard heat range) plugs. So far this is giving excellent driveability and the plugs look good. |
||
| New jets and rods. Edelbrock recommends going 1 stage lean for every 3,000 feet of altitude as a baseline tune. Since I live close to 6,000 feet (and most of my driving is in the mountains), I went 2 stages lean on primaries and secondaries. From Edelbrock's owner's manual, this is a #1430 (0.104") primary jet, #1429 (0.101") secondary jet, and #1450 metering rod. Eventually I'll have this set-up dyno'd to check the AFR's across the whole rpm range under load. | 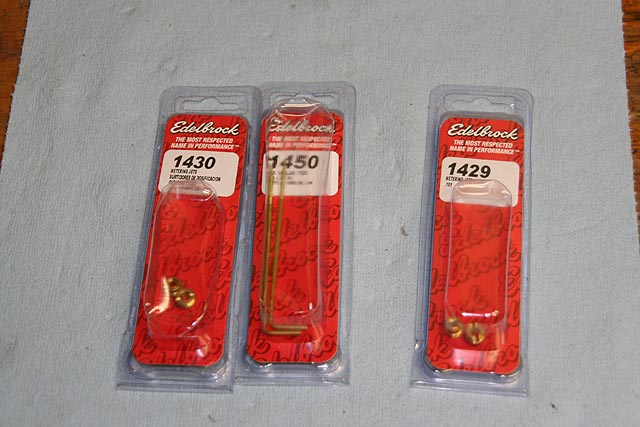 |
||
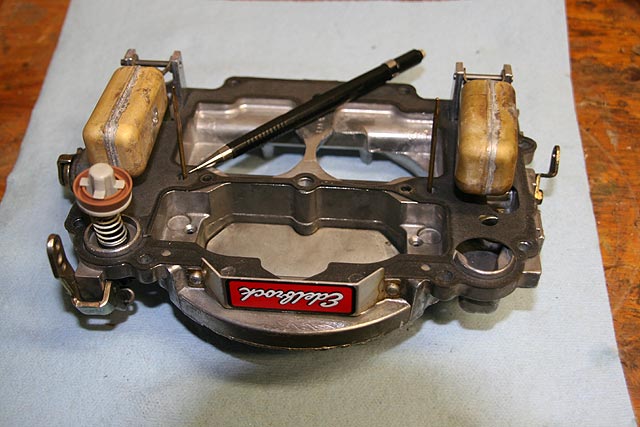
Take the top cover off. Here's the top piece of the Edelbrock carburator (shown upside down). To get this off, you'll need to disconnect the accelerator pump linkage, the two choke-related linkages, and the fuel supply line. Note that the floats and metering rods come out with the top cover. The black pencil in the photo is pointing to one of the metering rods. Be very careful not to bend these.
| Bottom half. Here's the business end of the Edelbrock carb. The two external idle mixture screws are visible in the bottom of the photo. The black pencil is pointing at one of the primary jets. Jets are easily removed with a screwdriver. Make sure the screwdriver blade is wide enough to "bite" into both sides of the groove on the jet. Secondary jets are located towards the rear. There are two primary and two secondary jets, so a total of four altogether. | 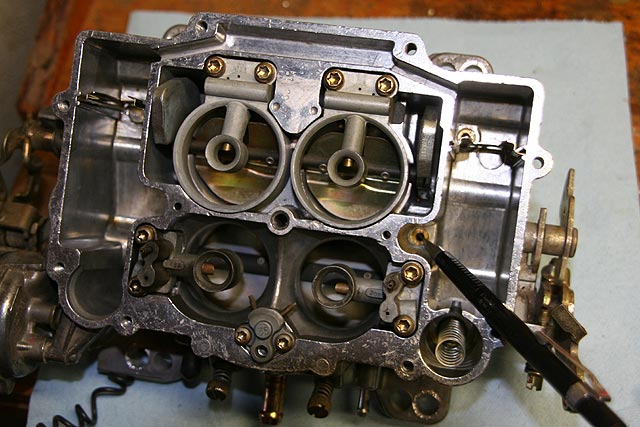 |
||
| Changing out metering rods. It is not necessary to remove the carburator top cover to replace the metering rods. The rods (and their springs) are easily accessed from the top of the carburator by removing the bolt-on covers (one per side) as shown in the photo. Note there are no secondary rods. Now everything can be put back together and tested on the road! | 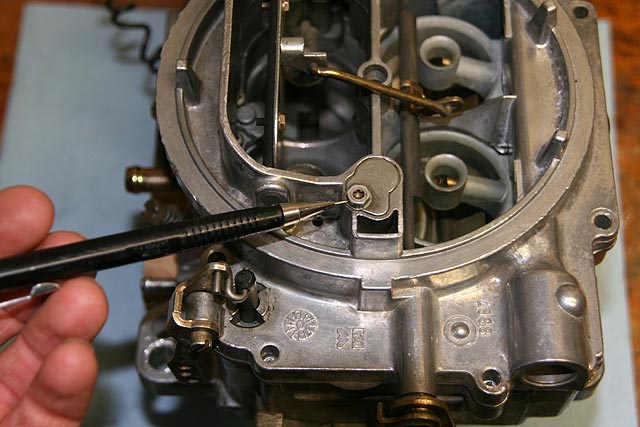 |
|||
| After installing new rods/jets, drive the car. Pay attention to engine response during starts-from-stops and part-throttle acceleration, and give it a few WOT pulls too. If the car pulls solidly without stumbling or surging, then chances are you've got a good street tune. Use your "butt dyno" - i.e. how does the car feel? If it feels good, it probably is. Also check your spark plugs about 500 miles after a new tune. Learn to "read" the spark plugs (most plug manufacturers' web sites have colored guides on how to "read" plugs). If the burn pattern looks good on the plugs, then you've probably got a good tune. The only way to make the tune better will be to get some dyno time. | ||||
| Continue to Part 10 - Lessons Learned | |||
Click here to return to the home page.
Contents copyright 2010.